
Introduction
UtopikAI lets you create custom assistants for teams and tasks such as HR, support, or sales. An assistant is for interactive chat. Each assistant can have its own instructions, models, knowledge, skills, tools, prompts, and optional scheduled tasks. Open Assistants and choose Create an Assistant. Setup runs through eight steps:- Basic Info
- Assistant Access
- Knowledge & Tools
- Prompts
- Advanced Settings
- Space Access
- Tasks
- Summary
Step 1: Basic Info
Set the assistant’s identity, instructions, and models.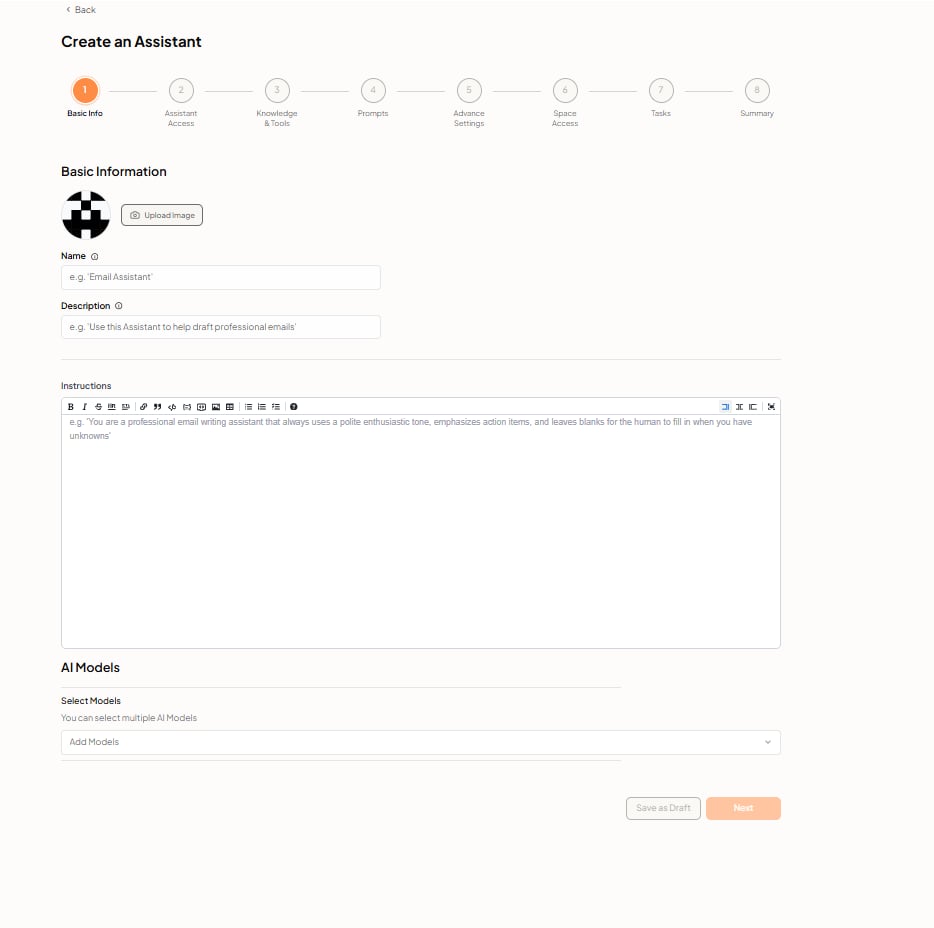
Basic Information
- Profile image — Optional avatar. Click Upload Image.
- Name — Identifier shown in chat and admin (for example
Email Assistant). - Description — Short summary of what the assistant is for (for example
Use this Assistant to help draft professional emails).
Instructions
The Instructions field is the assistant’s main prompt. It defines role, tone, and how to handle requests. Formatting tools (bold, lists, links, tables, and more) are available in the toolbar. Example:/ in chat, use the Prompt Library in Step 4.
AI Models
Under Select Models, choose one or more LLMs. You can add multiple models; users then pick among them in chat. The selected default model is shown later on the Summary step. Click Next to continue.Step 2: Assistant Access
Assistant Access controls who can use this assistant (for example specific users, groups, or the wider workspace). Choose the audience that should see and chat with it, then click Next.You can refine sharing later. Draft assistants stay unpublished until you click Publish on the Summary step.
Step 3: Knowledge & Tools
Connect document sets, skills, and tools the assistant can use when answering.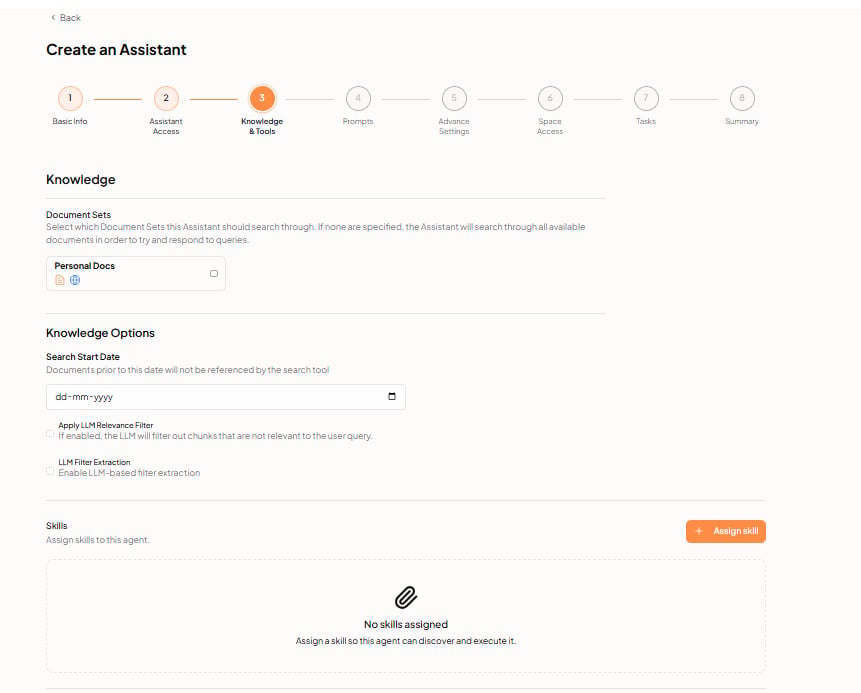
Document Sets
Select which Document Sets this assistant should search. If none are specified, the assistant searches all available documents.Knowledge Options
Skills
Assign reusable skills so the assistant can discover and run them. Click + Assign skill. If none are assigned, the empty state reads No skills assigned.Some screens in this step may say “agent” (for example “Assign skills to this agent”). You are still configuring an assistant.
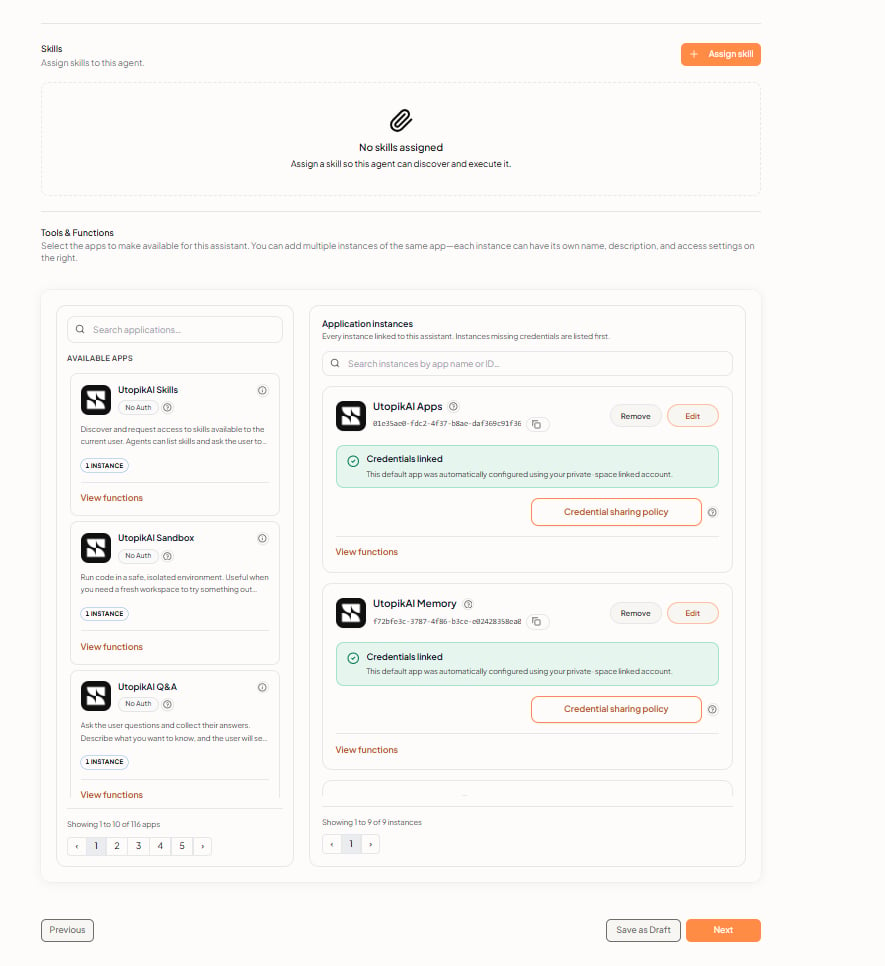
Tools & Functions
Select the apps available to this assistant. You can add multiple instances of the same app; each instance can have its own name, description, and access settings.- Available apps — Search and browse applications. Open View functions to see what an app can do.
- Application instances — Every instance linked to this assistant. Instances missing credentials are listed first. Use Edit, Remove, Credential sharing policy, or View functions as needed. See Tool Sharing for sharing policies, who can configure them, and what sharing does not do.
Step 4: Prompts
Add slash-command prompts and optional starter messages. Prompts you add here belong to this assistant only. They are not shared with agents or with other assistants.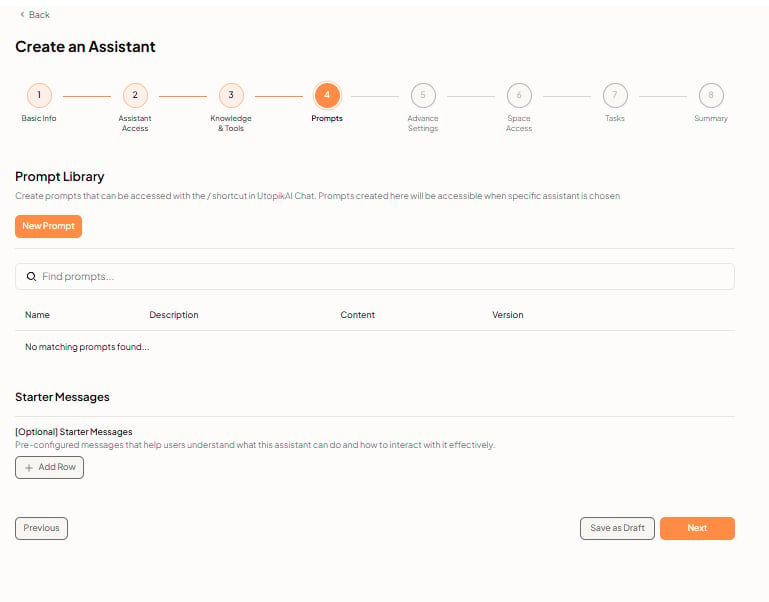
Prompt Library
The Prompt Library holds reusable prompts that users open with the/ shortcut in UtopikAI Chat. They are available when this assistant is selected. Use the library for repeatable requests (for example a standard email outline or a meeting-summary format). Keep the assistant’s always-on behavior in Instructions on Basic Info, not in the library.
- Click New Prompt.
- Give the prompt a Name, Description, and Content.
- Save it. The prompt appears in the table with a Version.
In chat, select the assistant, type
/, and pick the prompt from the list.
Starter Messages
Optional pre-configured messages that help users understand what this assistant can do and how to interact with it. Click + Add Row to add a starter. Starters appear as suggested first messages in chat; they are not/ library prompts.
Click Next when prompts and starters are ready.
Step 5: Advanced Settings
Optional settings for composition, localization, and structured I/O.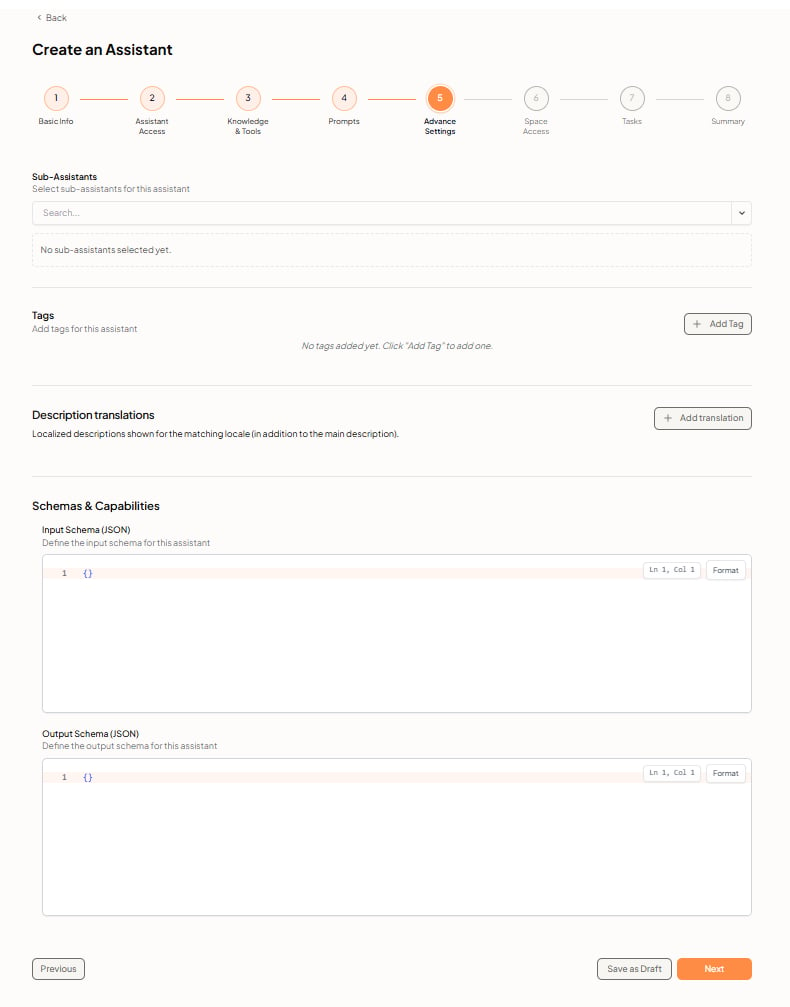
- Sub-Assistants — Search and select other assistants this one can call. If none are selected, the empty state reads No sub-assistants selected yet.
- Tags — Click + Add Tag to label the assistant for filtering and organization.
- Description translations — Localized descriptions shown for the matching locale, in addition to the main description. Click + Add translation.
- Input Schema (JSON) — Define the input schema for this assistant. Use Format to tidy the JSON.
- Output Schema (JSON) — Define the output schema. Both editors default to
{}.
Step 6: Space Access
Grant the assistant access to specific spaces (and optionally a folder) so it can use space tools for those spaces.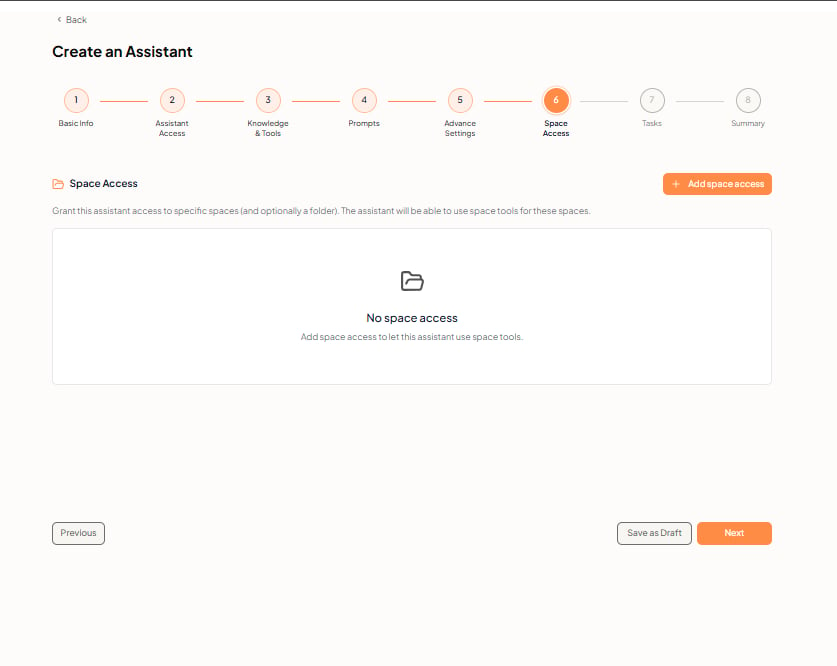
Step 7: Tasks
Attach scheduled or one-off tasks to this assistant.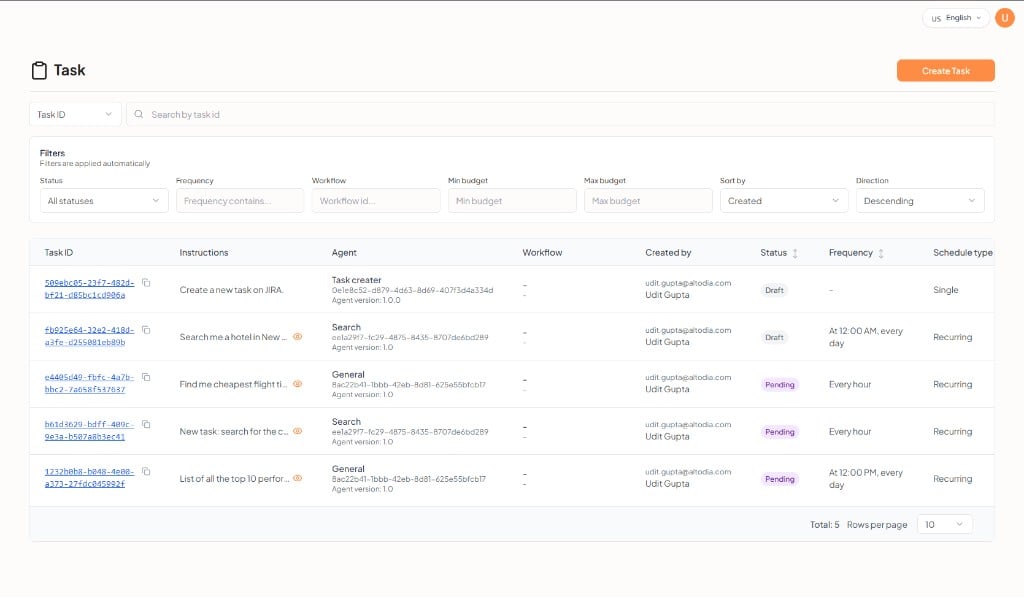
New task for assistant
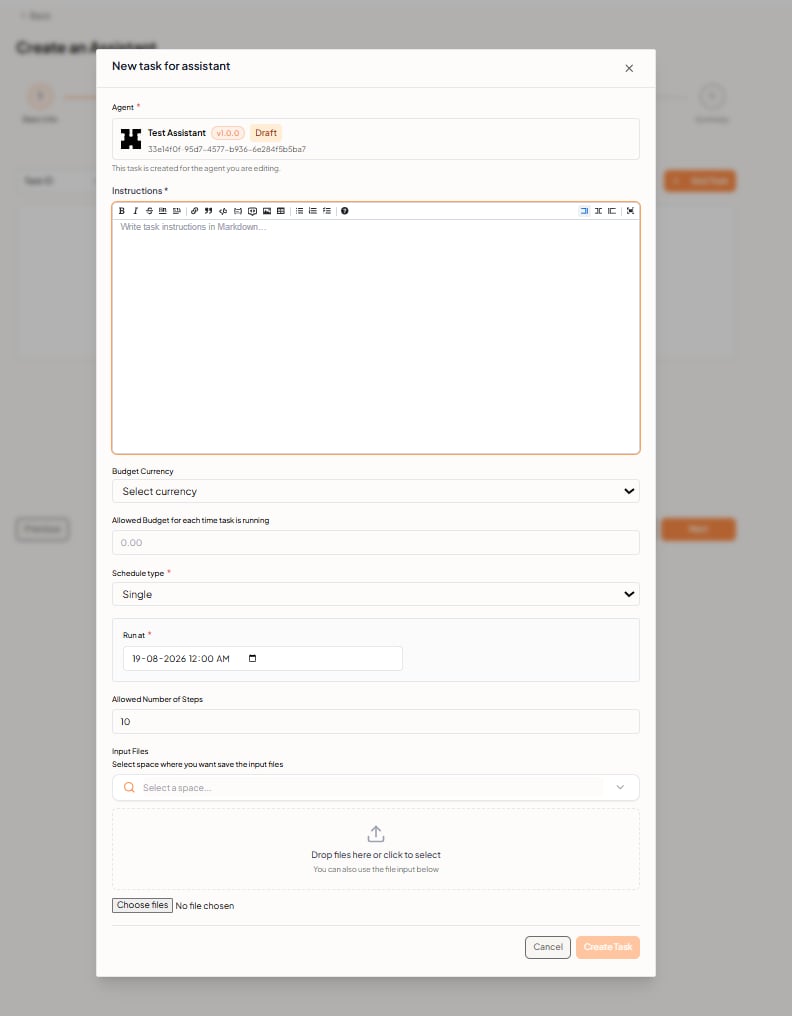
Click Create Task to save, or Cancel to close without adding a task.
For more on templates, runs, and results, see Tasks Overview.
Step 8: Summary
Review everything before publishing.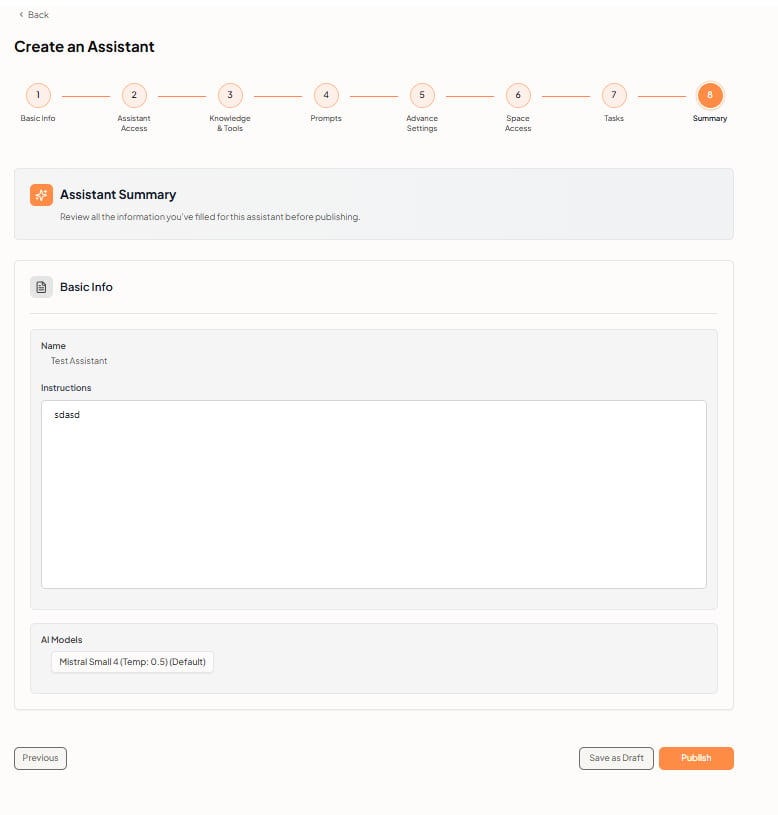
- Save as Draft — Keep the assistant unpublished.
- Publish — Make the assistant available according to the access settings from Step 2.
Writing effective instructions
The Instructions field on Basic Info should cover both role and handling rules. Role and behavior (who the assistant is):/ prompts belong in the Prompt Library, not in Instructions.
After you publish
- Test the assistant with typical queries in chat.
- Confirm document sets, skills, and tools behave as expected.
- Adjust instructions, models, or knowledge and save again.
- Use Tasks for recurring or scheduled work instead of one-off chat sessions.