> ## Documentation Index
> Fetch the complete documentation index at: https://docs.utopikai.com/llms.txt
> Use this file to discover all available pages before exploring further.
# MCP Servers
> Connect MCP servers so agents can call external systems
**MCP (Model Context Protocol)** servers link UtopikAI to systems you already use. Administrators add servers in **Admin** → **MCP Servers**. Attach a server to a specific **agent** when you [create or edit that agent](/guides/agents).
Each agent has its own MCP server list. Assistants do not share an agent's MCP servers.
## MCP Servers list
Open **Admin** from the profile menu, then go to **MCP Servers**.
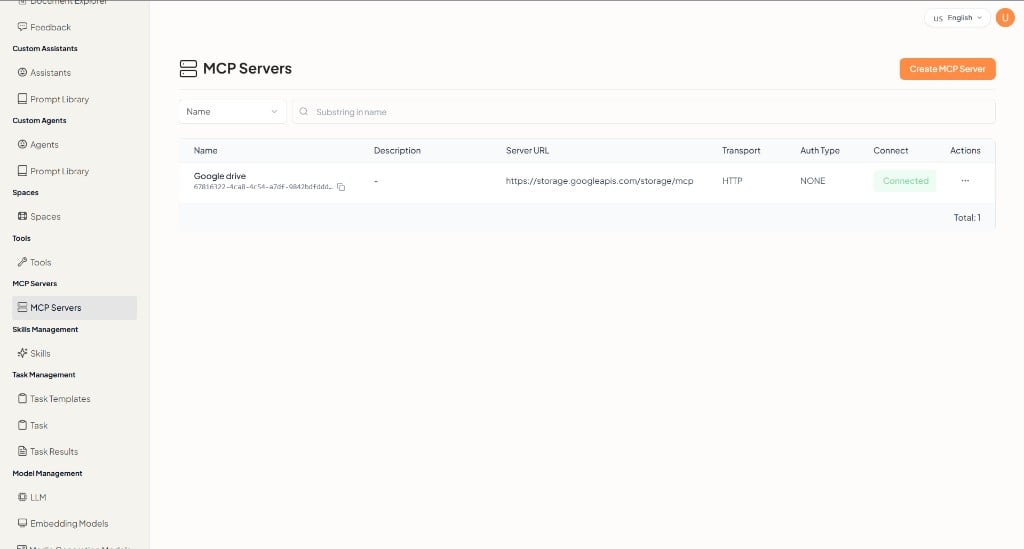 * **Create MCP Server** — Start the setup wizard.
* Search by **Name** using **Substring in name**.
| Column | What it shows |
| --------------- | ------------------------------------------------------- |
| **Name** | Display name and ID |
| **Description** | Optional description |
| **Server URL** | Endpoint for the server |
| **Transport** | How UtopikAI talks to the server (for example **HTTP**) |
| **Auth Type** | Authentication method (for example **NONE**) |
| **Connect** | Connection status (for example **Connected**) |
| **Actions** | Further options for that server |
## Create MCP Server
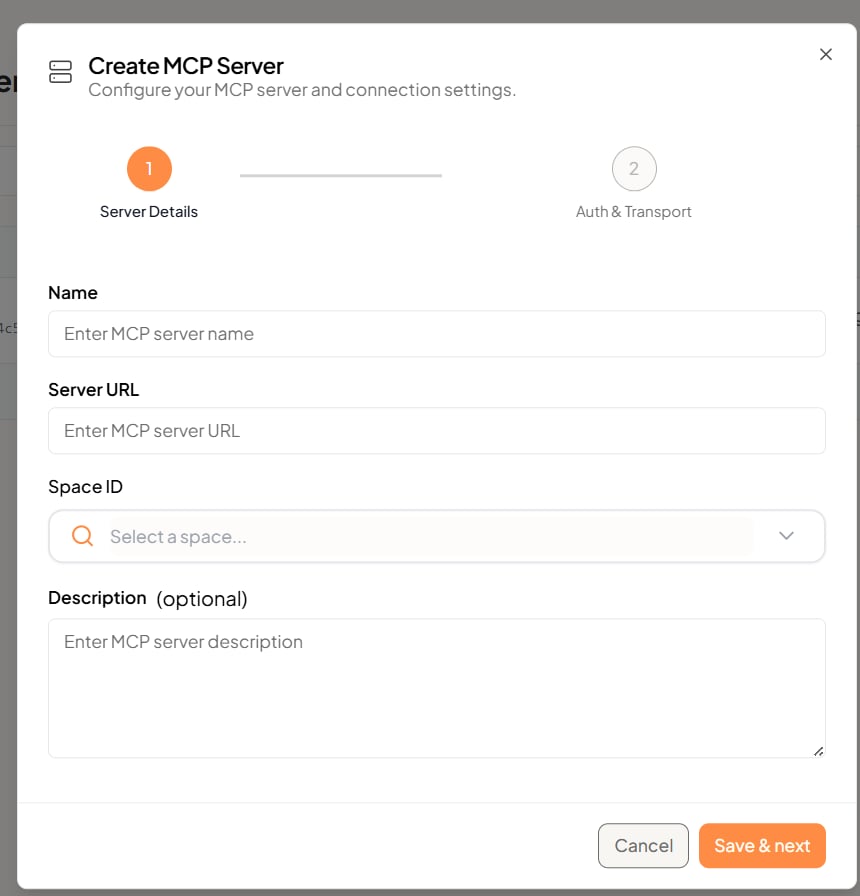
Setup has two steps: **Server Details**, then **Auth & Transport**.
### 1. Server Details
1. Click **Create MCP Server**.
2. Enter a **Name**.
3. Enter the **Server URL**.
4. Select a **space**.
5. Optionally enter a **Description**.
6. Click **Save & next**.
* **Create MCP Server** — Start the setup wizard.
* Search by **Name** using **Substring in name**.
| Column | What it shows |
| --------------- | ------------------------------------------------------- |
| **Name** | Display name and ID |
| **Description** | Optional description |
| **Server URL** | Endpoint for the server |
| **Transport** | How UtopikAI talks to the server (for example **HTTP**) |
| **Auth Type** | Authentication method (for example **NONE**) |
| **Connect** | Connection status (for example **Connected**) |
| **Actions** | Further options for that server |
## Create MCP Server
Setup has two steps: **Server Details**, then **Auth & Transport**.
### 1. Server Details
1. Click **Create MCP Server**.
2. Enter a **Name**.
3. Enter the **Server URL**.
4. Select a **space**.
5. Optionally enter a **Description**.
6. Click **Save & next**.
 ### 2. Auth & Transport
1. Choose a **Transport** (for example **HTTP**).
2. Choose an **Authentication Method**.
3. Click **Create MCP Server**.
If authentication is **None**, no credentials are sent. Only use that when you trust the server.
### 2. Auth & Transport
1. Choose a **Transport** (for example **HTTP**).
2. Choose an **Authentication Method**.
3. Click **Create MCP Server**.
If authentication is **None**, no credentials are sent. Only use that when you trust the server.
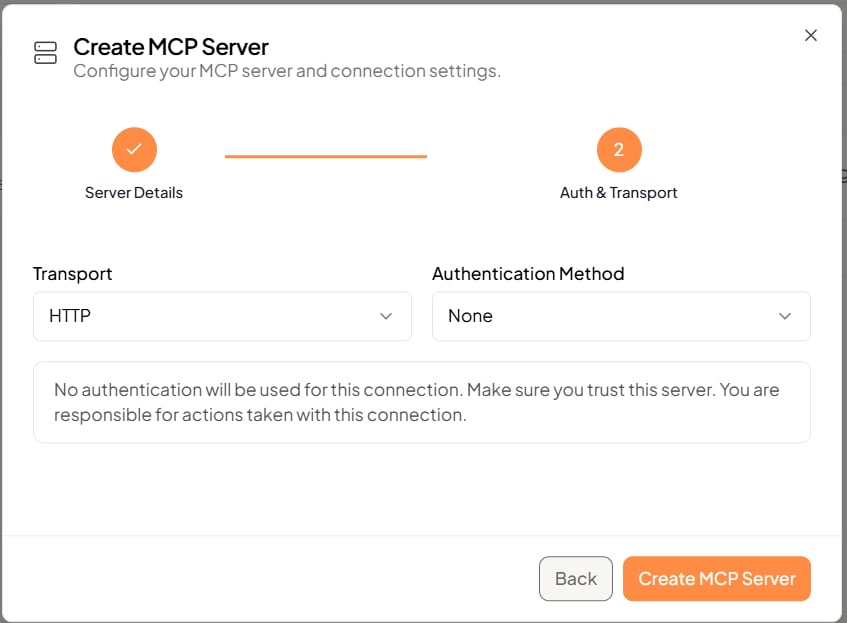 Use **Back** to change server details. Use **Cancel** to close without creating.
After the server is created and connected, add it to an agent with **+ Add MCP Server** in the agent setup wizard.
## Related documentation
* [Creating Agents](/guides/agents)
* [Tools Overview](/tools/overview)
* [Skills Overview](/skills/overview)
* [Introduction](/introduction)
Use **Back** to change server details. Use **Cancel** to close without creating.
After the server is created and connected, add it to an agent with **+ Add MCP Server** in the agent setup wizard.
## Related documentation
* [Creating Agents](/guides/agents)
* [Tools Overview](/tools/overview)
* [Skills Overview](/skills/overview)
* [Introduction](/introduction)