> ## Documentation Index
> Fetch the complete documentation index at: https://docs.utopikai.com/llms.txt
> Use this file to discover all available pages before exploring further.
# Creating Agents
> Create and configure AI agents in UtopikAI using the eight-step setup wizard
## Creating an agent
Open **Custom Agents** and create a new agent, or open an existing one to edit it. Setup uses the same eight-step wizard (the header reads **Create an Agent** or **Update an Agent**):
1. **Basic Info**
2. **Agent Access**
3. **Knowledge & Tools**
4. **Prompts**
5. **Advanced Settings**
6. **Space Access**
7. **Tasks**
8. **Summary**
Use **Next** and **Previous** to move between steps. When you are editing an existing agent, **Active**, version, **Update Agent Status**, and **Test Mode** appear in the header.
Each agent has its own models, knowledge, skills, tools, and prompts. Those settings are not shared with assistants — configure every agent on its own.
## Step 1: Basic Info
Set the agent's identity, instructions, and models.
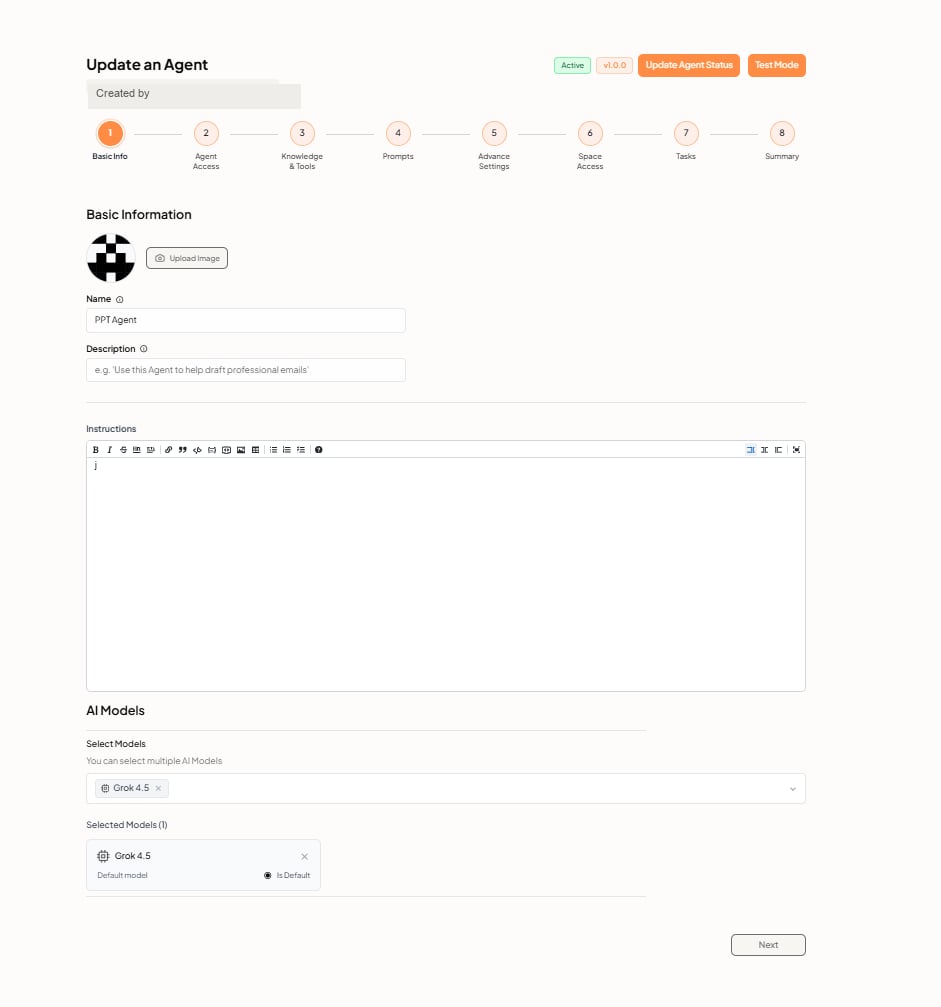 ### Basic Information
* **Profile image** — Optional avatar. Click **Upload Image**.
* **Name** — Identifier for the agent (for example `PPT Agent`).
* **Description** — Short summary of what the agent is for.
### Instructions
The **Instructions** field is the agent's main prompt. It defines role, tone, and how it should handle work. Formatting tools (bold, italic, lists, links, and more) are available in the toolbar.
Write instructions that cover both **who the agent is** and **how it should act**. For reusable `/` prompts, use the **Prompt Library** in [Step 4](#step-4-prompts).
### AI Models
Under **Select Models**, choose one or more LLMs. Mark one as **Is Default**. The selected default model is shown later on the Summary step.
Click **Next** to continue.
## Step 2: Agent Access
**Agent Access** controls who can use this agent: specific people, or everyone in the workspace.
### Basic Information
* **Profile image** — Optional avatar. Click **Upload Image**.
* **Name** — Identifier for the agent (for example `PPT Agent`).
* **Description** — Short summary of what the agent is for.
### Instructions
The **Instructions** field is the agent's main prompt. It defines role, tone, and how it should handle work. Formatting tools (bold, italic, lists, links, and more) are available in the toolbar.
Write instructions that cover both **who the agent is** and **how it should act**. For reusable `/` prompts, use the **Prompt Library** in [Step 4](#step-4-prompts).
### AI Models
Under **Select Models**, choose one or more LLMs. Mark one as **Is Default**. The selected default model is shown later on the Summary step.
Click **Next** to continue.
## Step 2: Agent Access
**Agent Access** controls who can use this agent: specific people, or everyone in the workspace.
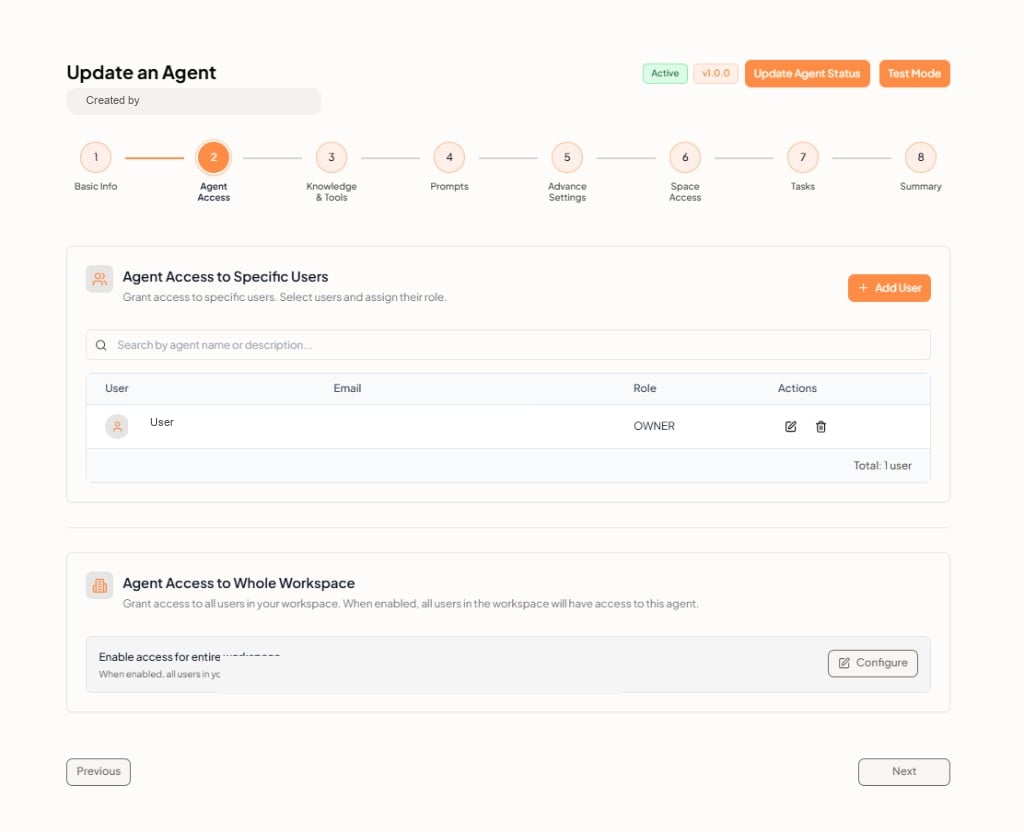 ### Agent Access to Specific Users
Grant access to individual users and assign a role. Click **+ Add User**. Search the list, then set **User**, **Email**, and **Role** (for example `OWNER`). Use the row actions to edit or remove access.
### Agent Access to Whole Workspace
Enable access for the entire workspace so every user in that workspace can use the agent. Click **Configure** to turn this on or off.
Click **Next** when access is set.
## Step 3: Knowledge & Tools
Connect document sets, skills, MCP servers, and tools the agent can use.
### Agent Access to Specific Users
Grant access to individual users and assign a role. Click **+ Add User**. Search the list, then set **User**, **Email**, and **Role** (for example `OWNER`). Use the row actions to edit or remove access.
### Agent Access to Whole Workspace
Enable access for the entire workspace so every user in that workspace can use the agent. Click **Configure** to turn this on or off.
Click **Next** when access is set.
## Step 3: Knowledge & Tools
Connect document sets, skills, MCP servers, and tools the agent can use.
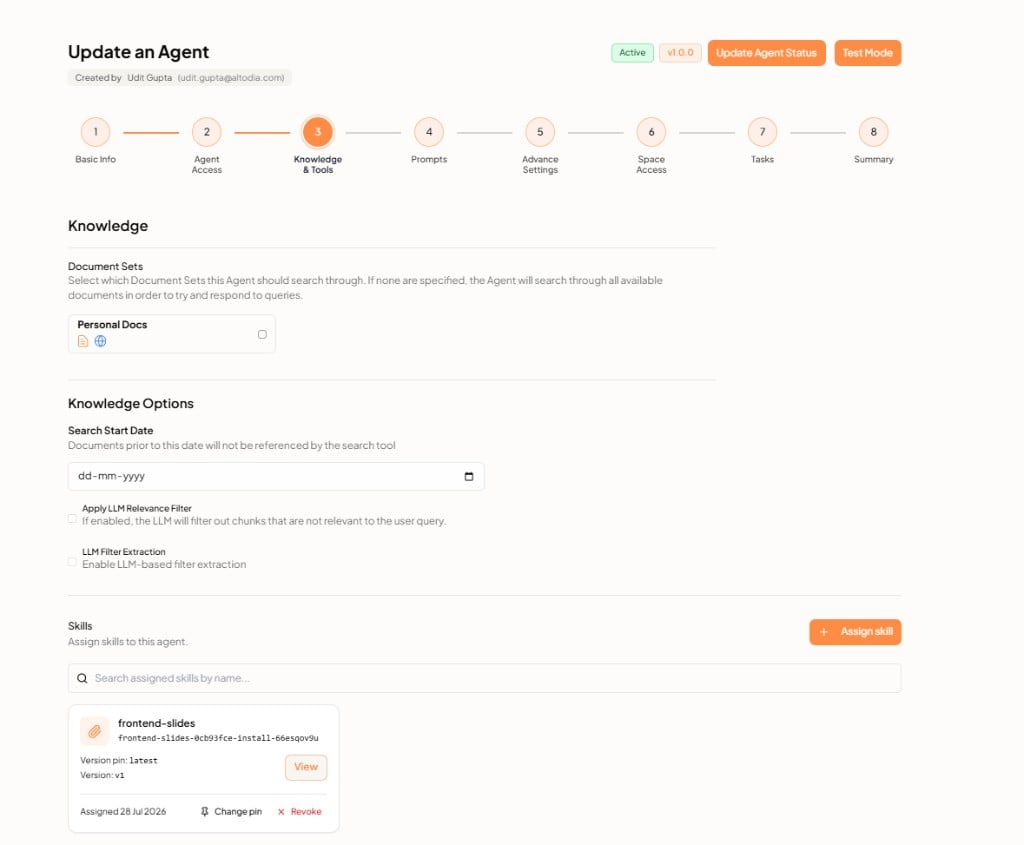 ### Document Sets
Select which **Document Sets** this agent should search (for example a personal docs set).
### Knowledge Options
| Setting | What it does |
| ------------------------------ | ------------------------------------------------------------ |
| **Search Start Date** | Documents before this date are not referenced by search |
| **Apply LLM Relevance Filter** | If enabled, the LLM filters out chunks that are not relevant |
| **LLM Filter Extraction** | Enables LLM-based filter extraction |
### Skills
Assign reusable skills so the agent can discover and run them. Click **+ Assign skill** and search assigned skills by name. Each assigned skill shows version, assignment date, and actions such as **View**, **Change pin**, and **Revoke**.
### MCP Servers
Connect MCP servers this agent can call. Click **+ Add MCP Server**. If none are selected, the empty state reads *No MCP servers selected.*
### Document Sets
Select which **Document Sets** this agent should search (for example a personal docs set).
### Knowledge Options
| Setting | What it does |
| ------------------------------ | ------------------------------------------------------------ |
| **Search Start Date** | Documents before this date are not referenced by search |
| **Apply LLM Relevance Filter** | If enabled, the LLM filters out chunks that are not relevant |
| **LLM Filter Extraction** | Enables LLM-based filter extraction |
### Skills
Assign reusable skills so the agent can discover and run them. Click **+ Assign skill** and search assigned skills by name. Each assigned skill shows version, assignment date, and actions such as **View**, **Change pin**, and **Revoke**.
### MCP Servers
Connect MCP servers this agent can call. Click **+ Add MCP Server**. If none are selected, the empty state reads *No MCP servers selected.*
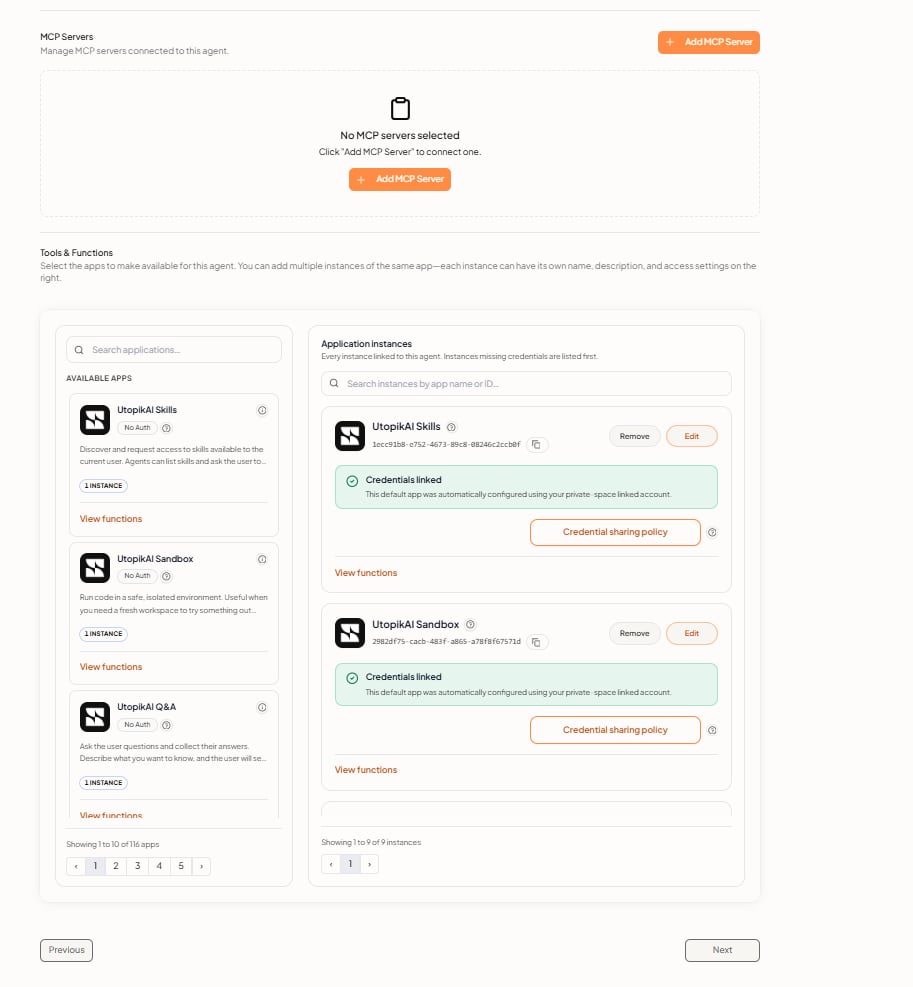 ### Tools & Functions
Select the apps available to this agent. You can add **multiple instances** of the same app.
* **Available apps** — Search applications, see auth type and instance count, and open **View functions**.
* **Application instances** — Every instance linked to this agent. Use **Edit**, **Remove**, **Credential sharing policy**, or **View functions**. Default apps may show that credentials are already linked from the private-space account. See [Tool Sharing](/tools/credential_sharing) for sharing policies, who can configure them, and what sharing does not do.
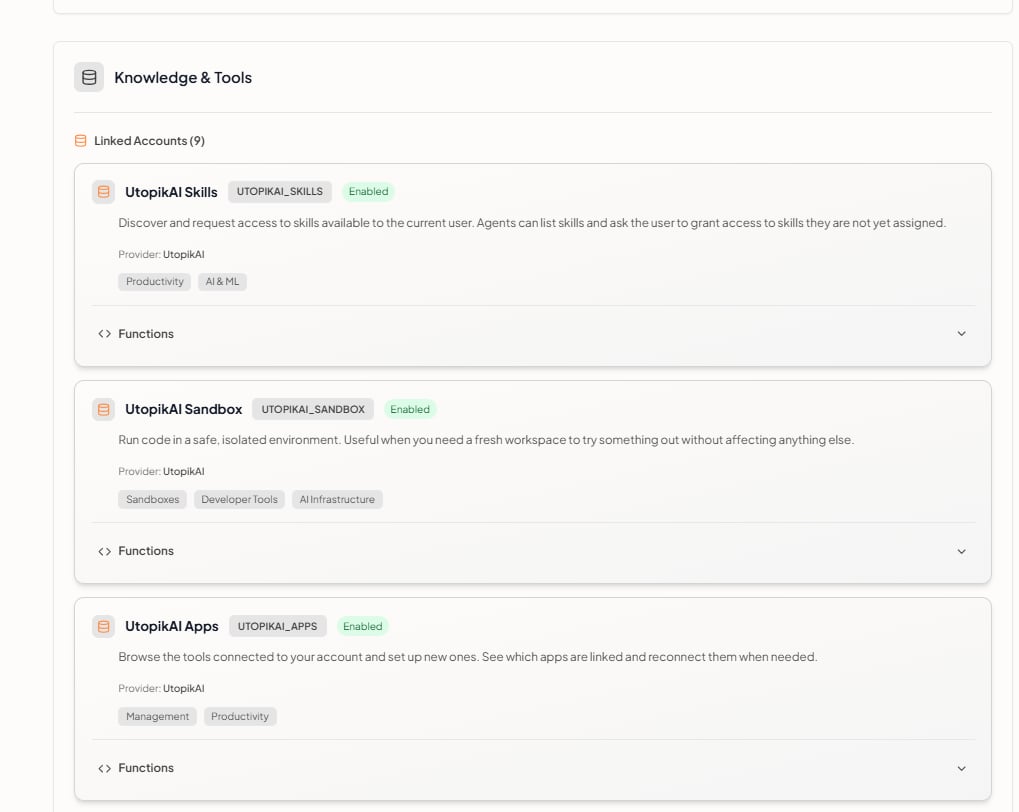
Linked accounts for those apps appear as cards (name, provider, tags, enabled status, and expandable **Functions**).
### Tools & Functions
Select the apps available to this agent. You can add **multiple instances** of the same app.
* **Available apps** — Search applications, see auth type and instance count, and open **View functions**.
* **Application instances** — Every instance linked to this agent. Use **Edit**, **Remove**, **Credential sharing policy**, or **View functions**. Default apps may show that credentials are already linked from the private-space account. See [Tool Sharing](/tools/credential_sharing) for sharing policies, who can configure them, and what sharing does not do.
Linked accounts for those apps appear as cards (name, provider, tags, enabled status, and expandable **Functions**).
 Click **Next** when knowledge, skills, and tools are configured.
## Step 4: Prompts
Add slash-command prompts and optional starter messages.
Click **Next** when knowledge, skills, and tools are configured.
## Step 4: Prompts
Add slash-command prompts and optional starter messages.
 ### Prompt Library
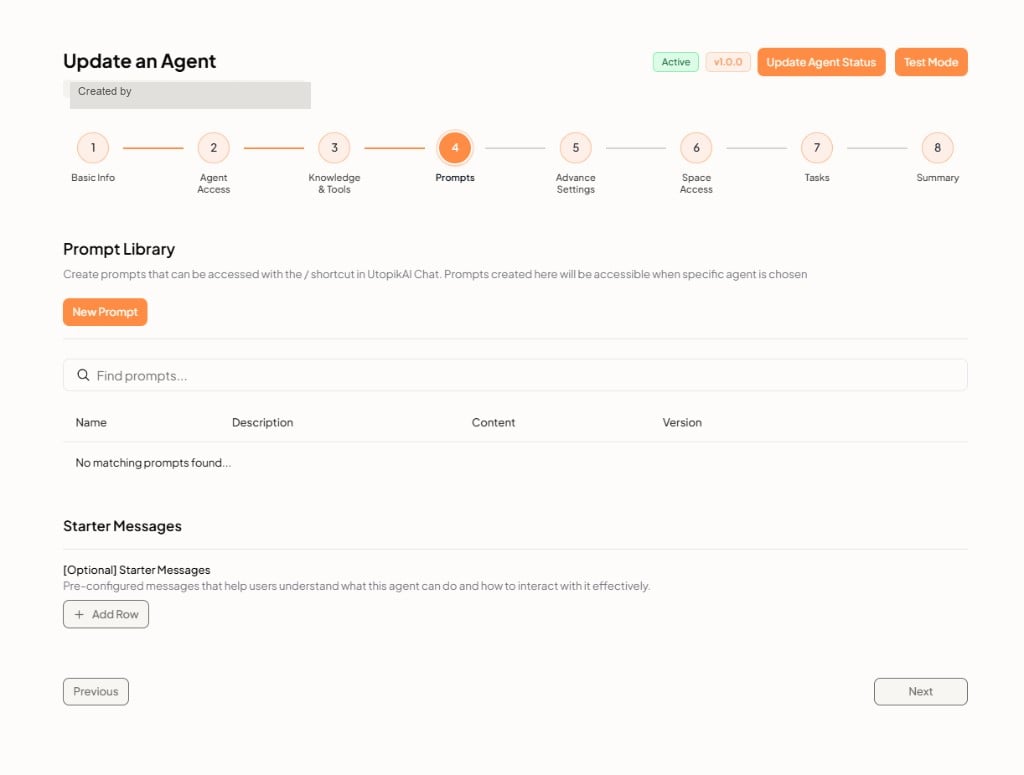
Create prompts that can be opened with the **`/`** shortcut. Prompts created here are available when this agent is selected.
Click **New Prompt**, then search existing prompts with **Find prompts...**. The table lists **Name**, **Description**, **Content**, and **Version**.
### Starter Messages
Optional pre-configured messages. Click **+ Add Row** to add one.
## Step 5: Advanced Settings
Optional settings for composition, localization, and structured I/O.
### Prompt Library
Create prompts that can be opened with the **`/`** shortcut. Prompts created here are available when this agent is selected.
Click **New Prompt**, then search existing prompts with **Find prompts...**. The table lists **Name**, **Description**, **Content**, and **Version**.
### Starter Messages
Optional pre-configured messages. Click **+ Add Row** to add one.
## Step 5: Advanced Settings
Optional settings for composition, localization, and structured I/O.
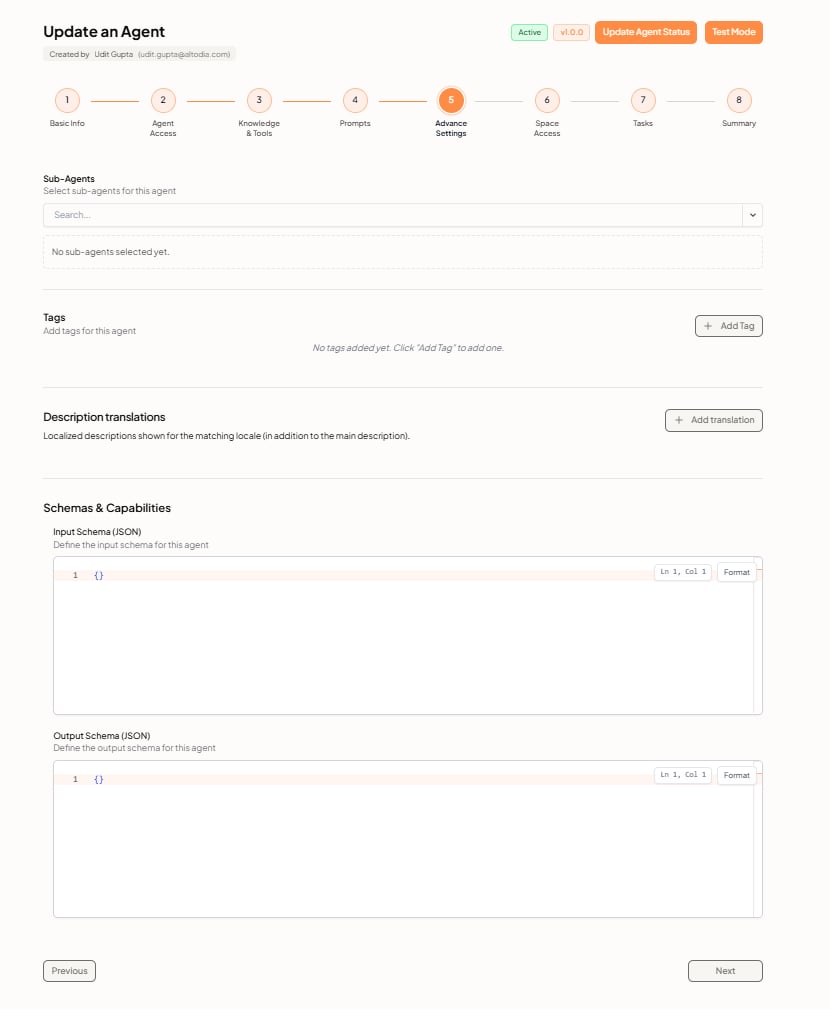 * **Sub-Agents** — Search and select other agents this one can call. If none are selected, the empty state reads *No sub-agents selected yet.*
* **Tags** — Click **+ Add Tag** to label the agent.
* **Description translations** — Localized descriptions in addition to the main description. Click **+ Add translation**.
* **Input Schema (JSON)** — Define the input schema. Use **Format** to tidy the JSON.
* **Output Schema (JSON)** — Define the output schema. Both editors default to `{}`.
## Step 6: Space Access
Grant the agent access to specific spaces (and optionally a folder) so it can use space tools for those spaces.
* **Sub-Agents** — Search and select other agents this one can call. If none are selected, the empty state reads *No sub-agents selected yet.*
* **Tags** — Click **+ Add Tag** to label the agent.
* **Description translations** — Localized descriptions in addition to the main description. Click **+ Add translation**.
* **Input Schema (JSON)** — Define the input schema. Use **Format** to tidy the JSON.
* **Output Schema (JSON)** — Define the output schema. Both editors default to `{}`.
## Step 6: Space Access
Grant the agent access to specific spaces (and optionally a folder) so it can use space tools for those spaces.
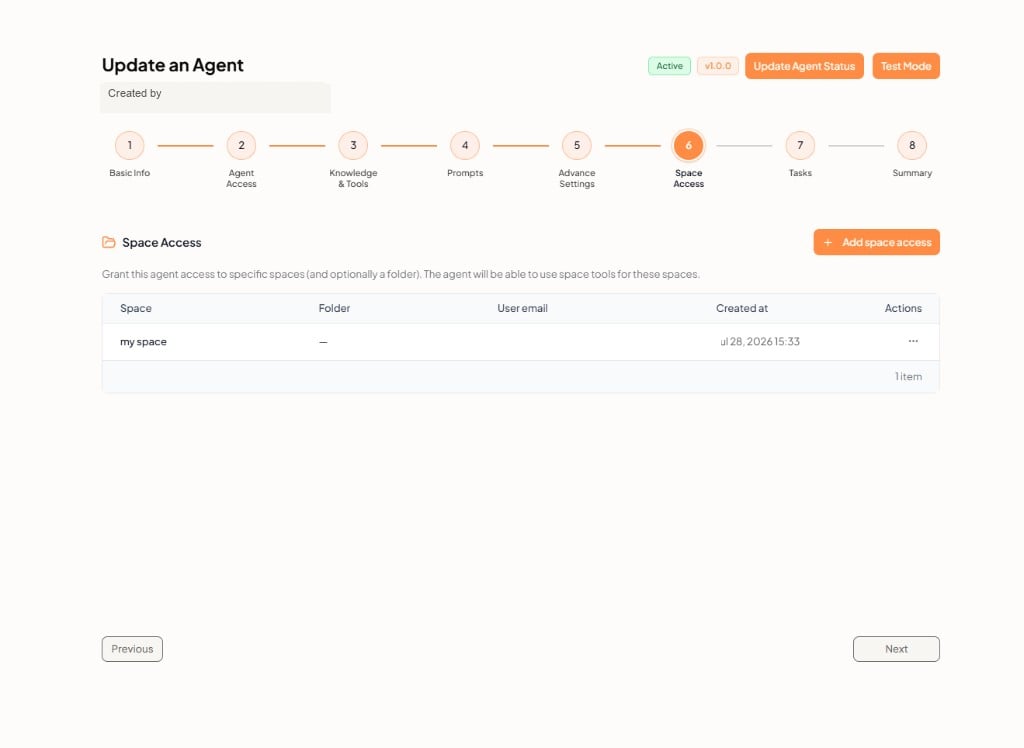 Click **+ Add space access**. The table lists **Space**, **Folder**, **User email**, **Created at**, and **Actions**.
## Step 7: Tasks
Attach scheduled or one-off tasks to this **agent**.
Click **+ Add space access**. The table lists **Space**, **Folder**, **User email**, **Created at**, and **Actions**.
## Step 7: Tasks
Attach scheduled or one-off tasks to this **agent**.
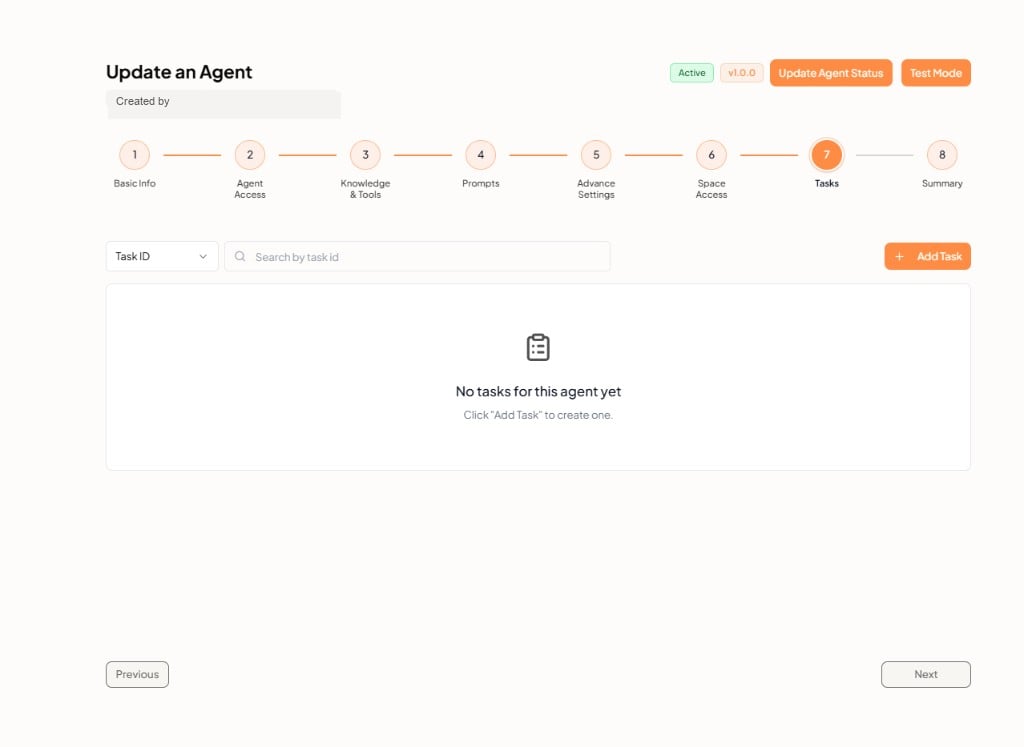 Search existing tasks by **Task ID**, or click **+ Add Task**. If none exist, the empty state reads *No tasks for this agent yet.*
### New task for agent
Search existing tasks by **Task ID**, or click **+ Add Task**. If none exist, the empty state reads *No tasks for this agent yet.*
### New task for agent
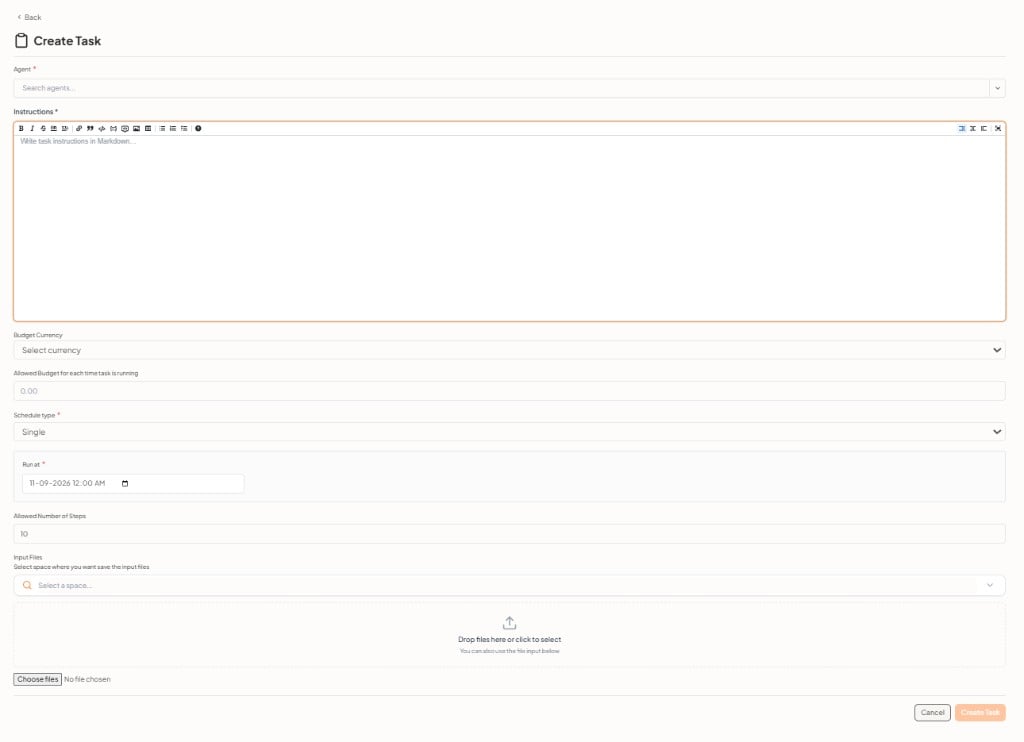 The **Agent** field is the agent you are editing (name, version, and status). The note reads *This task is created for the agent you are editing.*
| Field | Required | What it does |
| ------------------------------------------------ | -------- | -------------------------------------------------------------- |
| **Agent** | Yes | The agent you are editing (shown as name, version, and status) |
| **Instructions** | Yes | Task instructions in Markdown |
| **Budget Currency** | No | Currency for the run budget |
| **Allowed Budget for each time task is running** | No | Spend cap per run |
| **Schedule type** | Yes | For example **Single** |
| **Run at** | Yes | Date and time for a single run |
| **Allowed Number of Steps** | No | Maximum steps per run (default `10`) |
| **Input Files** | No | Space to save files, plus drag-and-drop or **Choose files** |
Click **Create Task** to save, or **Cancel** to close without adding a task.
For more on templates, runs, and results, see [Tasks Overview](/tasks/overview).
## Step 8: Summary
Review everything before publishing.
The **Agent** field is the agent you are editing (name, version, and status). The note reads *This task is created for the agent you are editing.*
| Field | Required | What it does |
| ------------------------------------------------ | -------- | -------------------------------------------------------------- |
| **Agent** | Yes | The agent you are editing (shown as name, version, and status) |
| **Instructions** | Yes | Task instructions in Markdown |
| **Budget Currency** | No | Currency for the run budget |
| **Allowed Budget for each time task is running** | No | Spend cap per run |
| **Schedule type** | Yes | For example **Single** |
| **Run at** | Yes | Date and time for a single run |
| **Allowed Number of Steps** | No | Maximum steps per run (default `10`) |
| **Input Files** | No | Space to save files, plus drag-and-drop or **Choose files** |
Click **Create Task** to save, or **Cancel** to close without adding a task.
For more on templates, runs, and results, see [Tasks Overview](/tasks/overview).
## Step 8: Summary
Review everything before publishing.
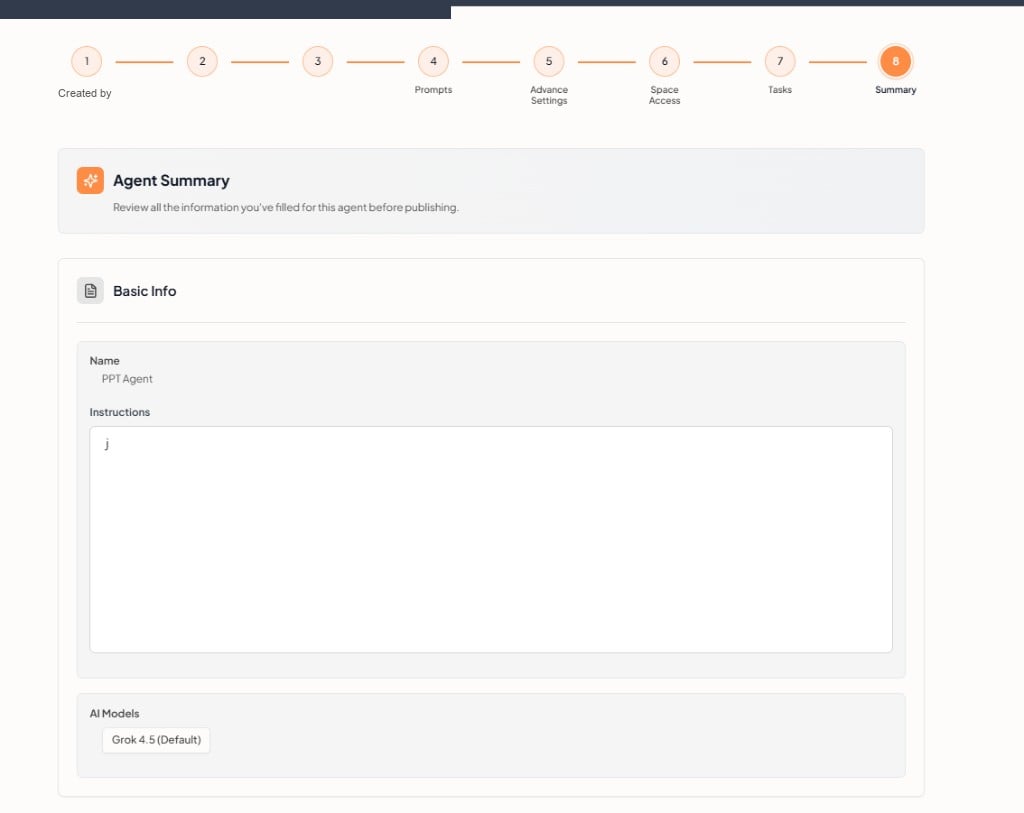 The **Agent Summary** card lists the details you entered, starting with **Basic Info** (name, instructions, and selected models, including the default).
Use **Previous** if you need to change an earlier step.
## Agents in workflows and tasks
* In **[workflows](/workflows/agent)**, connect agents to steps for generation, reasoning, or tool execution.
* In **Task Management**, assign an agent to a template or task instance so runs execute without a live chat session.
## Related documentation
* [Assistants](/guides/assistants_overview)
* [Introduction](/introduction)
* [How agents differ from assistants](/guides/assistants_vs_agents)
* [Creating Assistants](/guides/assistants)
* [LLM Providers](/guides/providers)
* [Tools Overview](/tools/overview)
* [MCP Servers](/mcp/overview)
* [Skills Overview](/skills/overview)
* [Workflows Overview](/workflows/overview)
* [Tasks Overview](/tasks/overview)
* [Connector Overview](/connectors/overview)
The **Agent Summary** card lists the details you entered, starting with **Basic Info** (name, instructions, and selected models, including the default).
Use **Previous** if you need to change an earlier step.
## Agents in workflows and tasks
* In **[workflows](/workflows/agent)**, connect agents to steps for generation, reasoning, or tool execution.
* In **Task Management**, assign an agent to a template or task instance so runs execute without a live chat session.
## Related documentation
* [Assistants](/guides/assistants_overview)
* [Introduction](/introduction)
* [How agents differ from assistants](/guides/assistants_vs_agents)
* [Creating Assistants](/guides/assistants)
* [LLM Providers](/guides/providers)
* [Tools Overview](/tools/overview)
* [MCP Servers](/mcp/overview)
* [Skills Overview](/skills/overview)
* [Workflows Overview](/workflows/overview)
* [Tasks Overview](/tasks/overview)
* [Connector Overview](/connectors/overview)