> ## Documentation Index
> Fetch the complete documentation index at: https://docs.utopikai.com/llms.txt
> Use this file to discover all available pages before exploring further.
# OAuth Setup
This section walks through setting up the Google Drive connector using a OAuth-enabled Google App.
Anyone can do this (even without a paid Google Workspace)!
If you're an organization with a Google Workspace, and you'd rather use a Service Account to access Google Drive,
checkout the section [here](/connectors/google_drive/service_account).
### Authorization
1. Create a **Google Cloud Project**
* [https://console.cloud.google.com/projectcreate](https://console.cloud.google.com/projectcreate)
2. Enable the **Google Drive API**
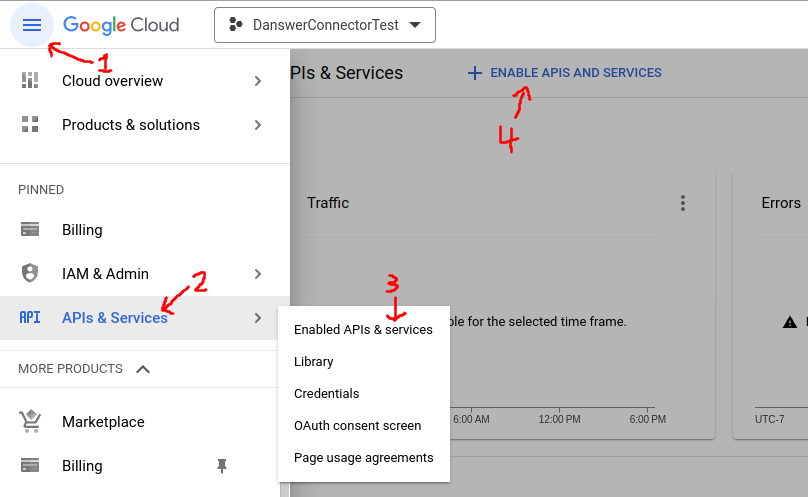
* On the left panel, open **APIs & services**
* Go to **Enabled APIs and services**
* On the top click **+ENABLE APIS AND SERVICES**
* Search for **Google Drive API** and click **ENABLE**
* Alternatively visit this [link](https://console.cloud.google.com/flows/enableapi?apiid=drive.googleapis.com),
select your project and enable the **Google Drive API**
3. Enable the **Admin SDK API**
* Click on **+ENABLE APIS AND SERVICES** again.
* Search for **Admin SDK API** and click **ENABLE**
* Alternatively visit this [link](https://console.cloud.google.com/flows/enableapi?apiid=admin.googleapis.com),
select your project and enable the **Admin SDK API**
4. Enable the **Google Sheets API**
* Click on **+ENABLE APIS AND SERVICES** again.
* Search for **Google Sheets API** and click **ENABLE**
* Alternatively visit this [link](https://console.cloud.google.com/flows/enableapi?apiid=sheets.googleapis.com),
select your project and enable the **Google Sheets API**
5. Enable the **Google Docs API**
* Click on **+ENABLE APIS AND SERVICES** again.
* Search for **Google Docs API** and click **ENABLE**
* Alternatively visit this [link](https://console.cloud.google.com/flows/enableapi?apiid=docs.googleapis.com),
select your project and enable the **Google Docs API**
 6. Set up the OAuth consent screen
* Under **APIs & services**, select the **OAuth consent screen** tab
* If you don't have a **Google Organization** select **External** for **User Type**
* Call the app UtopikAI (or whatever you want)
* For the required emails, use any email of your choice or `founders@UtopikAI.app`
if you wish for the UtopikAI team to help handle issues.
* Click **SAVE AND CONTINUE**
7. Set up Scopes
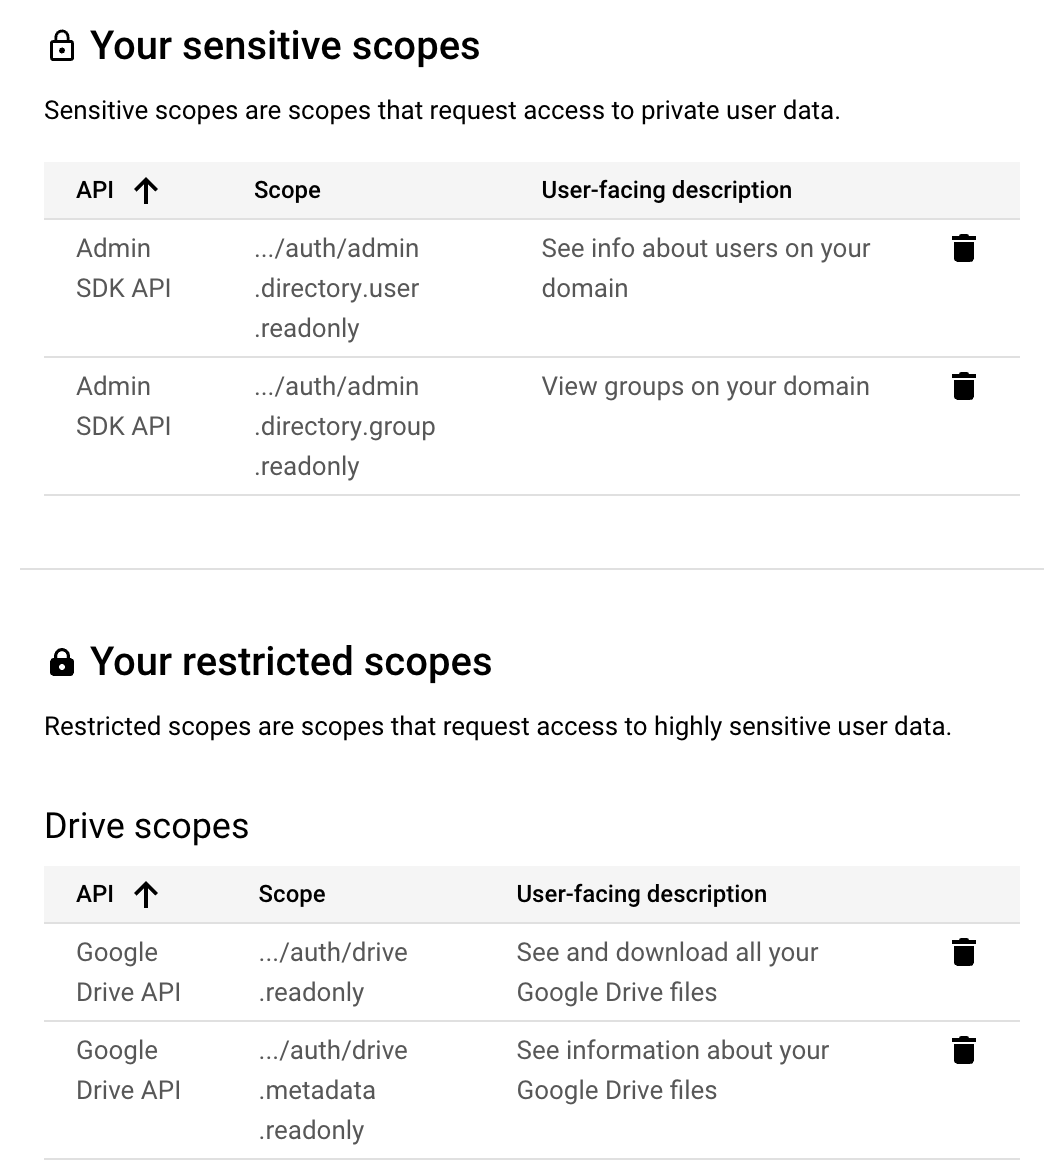
* Add the scope `.../auth/drive.readonly` for `Google Drive API`
* Add the scope `.../auth/drive.metadata.readonly` for `Google Drive API`
* Add the scope `.../auth/admin.directory.user.readonly` for `Admin SDK API`
* Add the scope `.../auth/admin.directory.group.readonly` for `Admin SDK API`
**Important**: If you plan on using permission syncing for this connector, the account performing the OAuth flow must have an Admin role in the Google Workspace that has access to the "Groups > Read" privilege.
This can be set by an admin in the admin panel of the Google Workspace under Account>Admin roles.
6. Set up the OAuth consent screen
* Under **APIs & services**, select the **OAuth consent screen** tab
* If you don't have a **Google Organization** select **External** for **User Type**
* Call the app UtopikAI (or whatever you want)
* For the required emails, use any email of your choice or `founders@UtopikAI.app`
if you wish for the UtopikAI team to help handle issues.
* Click **SAVE AND CONTINUE**
7. Set up Scopes
* Add the scope `.../auth/drive.readonly` for `Google Drive API`
* Add the scope `.../auth/drive.metadata.readonly` for `Google Drive API`
* Add the scope `.../auth/admin.directory.user.readonly` for `Admin SDK API`
* Add the scope `.../auth/admin.directory.group.readonly` for `Admin SDK API`
**Important**: If you plan on using permission syncing for this connector, the account performing the OAuth flow must have an Admin role in the Google Workspace that has access to the "Groups > Read" privilege.
This can be set by an admin in the admin panel of the Google Workspace under Account>Admin roles.
### You should see something like this:
8. Set up Test users
* This is only applicable for users without a Google Organization.
* Typically for a company, UtopikAI would be set up as an internal app so this step would not apply.
* Add at least one test user email. Only the email accounts added here will be allowed to run the OAuth
flow to index new documents.
* Click **SAVE AND CONTINUE**, review the changes and click **BACK TO DASHBOARD**
9. Create Credentials
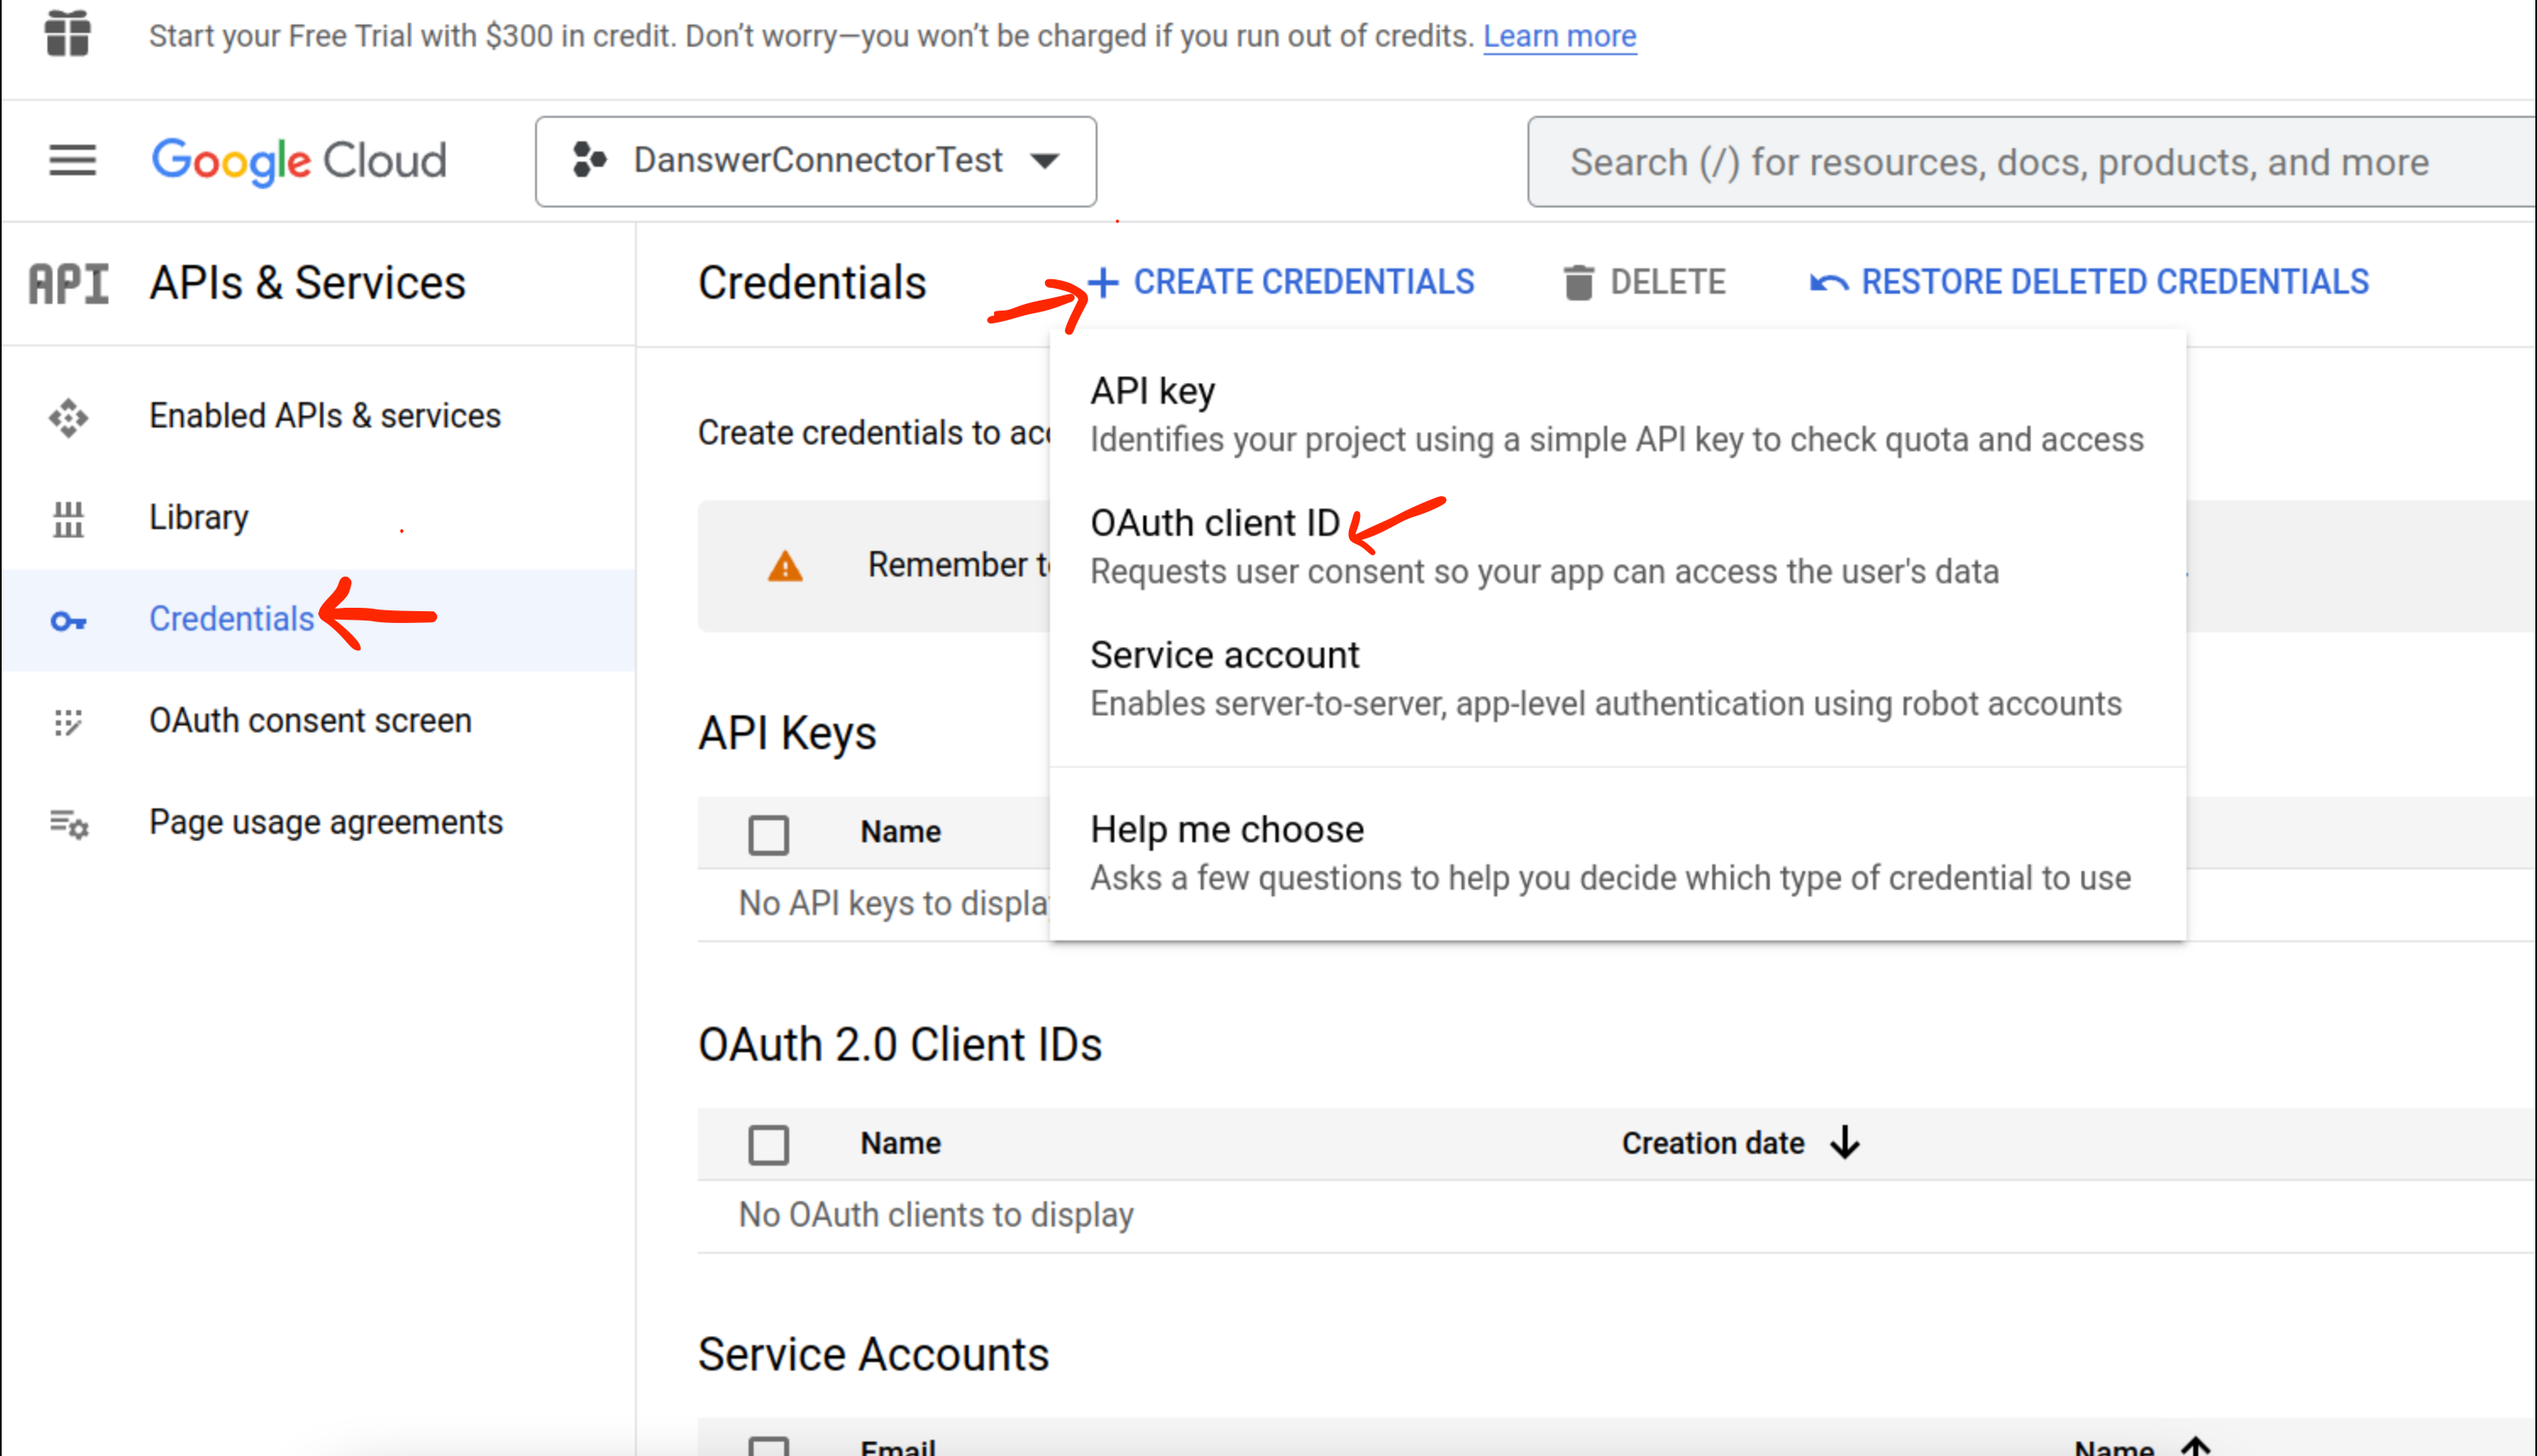
* Go to the **Credentials** tab and select **+ CREATE CREDENTIALS** -> **OAuth client ID**
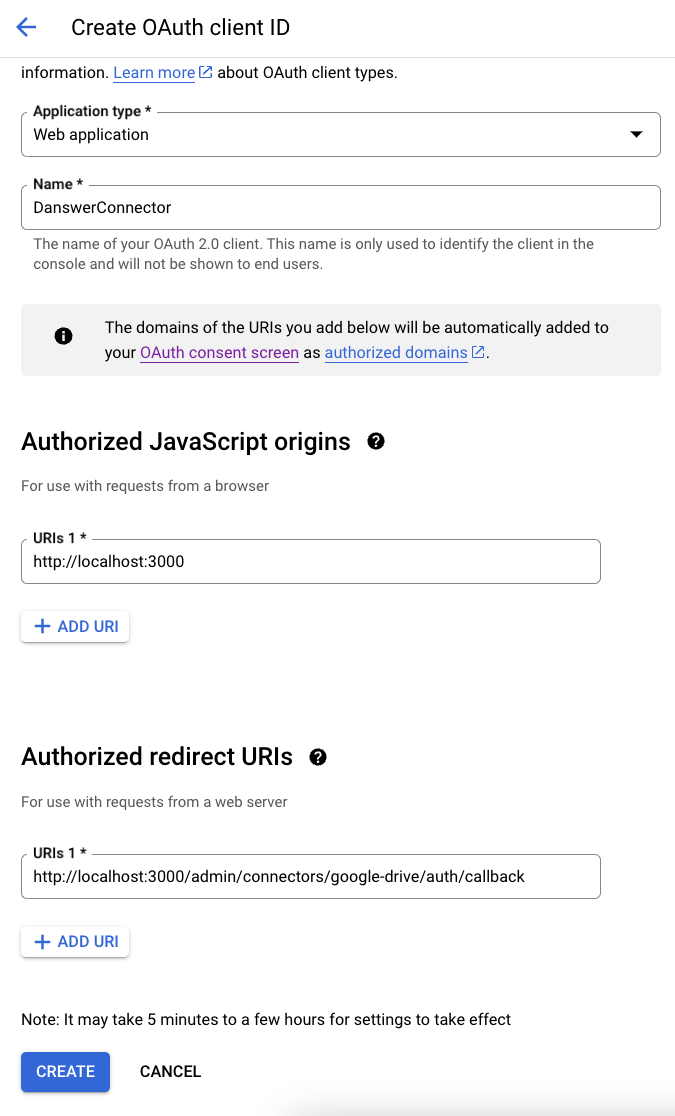
* Choose **Web application** and give it some name like `UtopikAIConnector`
* Add a **Authorized JavaScript origins** for `http://localhost:3000` (or `https://` if you have setup UtopikAI for production use)
* Add a **Authorized redirect URIs** for `http://localhost:3000/admin/connectors/google-drive/auth/callback` (or `https:///admin/connectors/google-drive/auth/callback` if you have setup UtopikAI for production use)
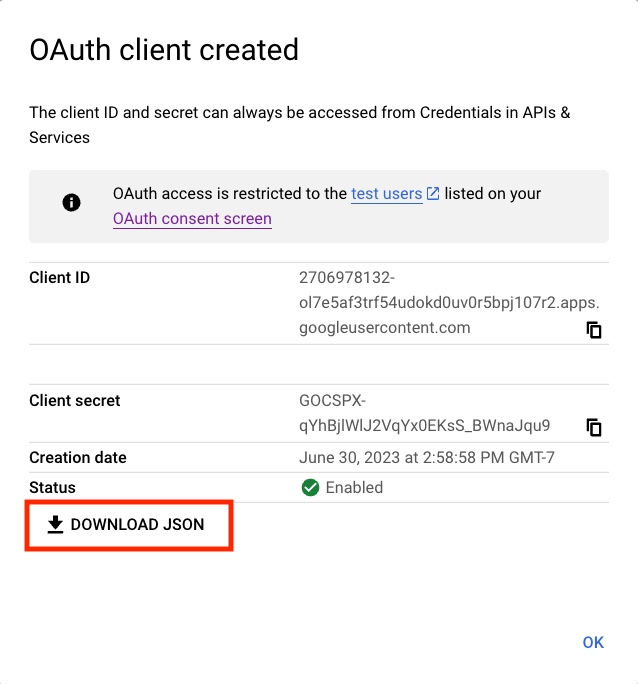
* Click create and on the right hand side next to **Client secret**, there is an option to download the
credentials as a JSON. Download the JSON for use in the next step.